
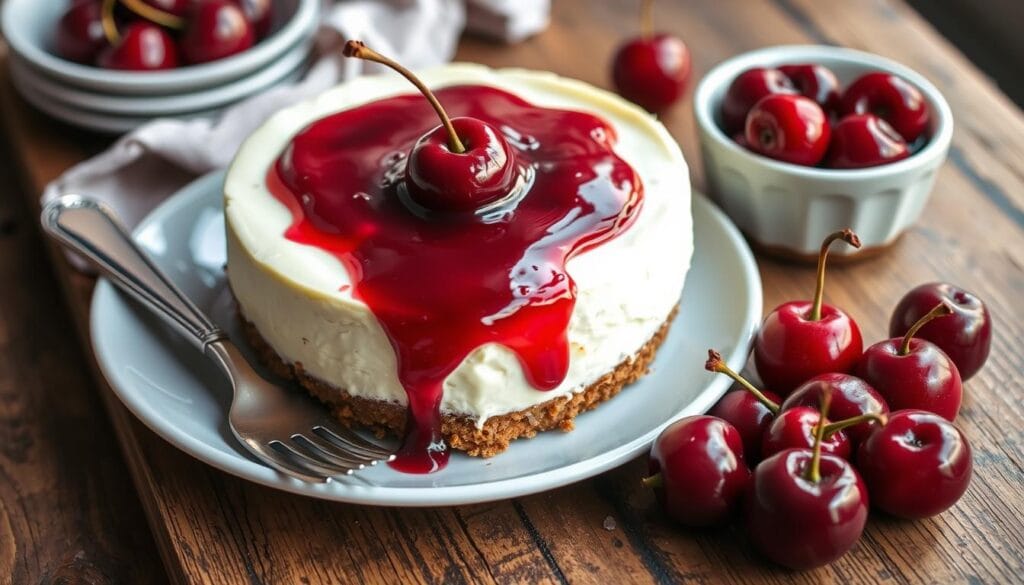
Imagine it’s a warm summer evening and guests are coming over. You want to impress them with a stunning dessert. But, who has hours to spend in the kitchen? The no bake cherry cheesecake is your secret weapon for a quick and delicious treat.
Picture serving a creamy, luscious dessert that looks like it took hours but only took 15 minutes. This no bake cherry cheesecake is perfect for any occasion. It’s great for both impromptu gatherings and planned dinner parties.
No need for complicated baking or hours of waiting. We’ll show you a simple method to make a restaurant-worthy dessert. Your friends and family will be impressed by your skills!
Table of Contents
Key Takeaways
- Create a delicious dessert in just 15 minutes
- No baking skills required
- Perfect for last-minute entertaining
- Minimal kitchen equipment needed
- Impressive dessert with minimal effort
Why This No-Bake Cherry Cheesecake Will Become Your Go-To Dessert
Looking for the ultimate cream cheese dessert for summer? Your search ends here! This no-bake cherry cheesecake is a game-changer. It’s simple to make and tastes amazing.
Time-Saving Benefits
Forget hours in a hot kitchen. This no-bake cheesecake takes just 15 minutes to make. It’s perfect for busy cooks. You’ll save time and still enjoy great taste and presentation.
- Preparation takes less than 15 minutes
- No oven required
- Minimal cleanup
Perfect for Any Occasion
Whether it’s a family dinner or a summer party, this dessert is ideal. Its elegant look and delicious taste work for any event, casual or formal.
“Dessert doesn’t have to be complicated to be delicious!” – Baking Enthusiasts Magazine
No Special Skills Required
Worried about your baking skills? Don’t be! This summer treat is easy to make. Even beginners can create a stunning dessert that looks like it came from a pro bakery.
- Beginner-friendly recipe
- No advanced techniques needed
- Guaranteed delicious results
Get ready to impress everyone with minimal effort!
Essential Ingredients for Your No Bake Cherry Cheesecake
Making a no-bake cherry cheesecake starts with picking the right ingredients. The quality of your dessert depends on the ingredients you choose. They should work together to make a creamy and tasty treat.
Here are the key ingredients you’ll need for this simple yet impressive dessert:
Graham Cracker Crust Ingredients
- Graham cracker crumbs (1½ cups)
- Unsalted butter (⅓ cup, melted)
- Granulated sugar (¼ cup)
Cheesecake Filling Ingredients
- Cream cheese (16 oz, softened)
- Powdered sugar (1 cup)
- Heavy whipping cream (1 cup)
- Vanilla extract (1 tsp)
Cherry Topping Ingredients
- Canned cherry pie filling (21 oz)
- Fresh cherries (optional, for garnish)
Your graham cracker crust is the base of this no-bake cheesecake. It’s made from graham cracker crumbs, melted butter, and sugar. This mix creates a crisp and tasty base that goes well with the creamy filling.
“The secret to an amazing no-bake cherry cheesecake lies in using fresh, quality ingredients.” – Pastry Chef Sarah Thompson
For the cherry topping, choose a high-quality canned cherry pie filling. Adding fresh cherries can make your dessert even fresher and prettier.
| Ingredient Category | Key Considerations |
|---|---|
| Graham Cracker Crust | Use fresh, crisp graham crackers for best texture |
| Cream Cheese | Ensure it’s fully softened at room temperature |
| Cherry Topping | Choose a filling with plump, vibrant cherries |
Pro tip: Always use room temperature ingredients to ensure smooth mixing and the perfect cheesecake consistency.
Kitchen Tools and Equipment Needed
Making a tasty no-bake cheesecake is easy without a fancy kitchen. Just a few basic tools will help you whip up this chilled treat. The right gear makes making your no-bake cheesecake fun and easy.
Basic Utensils You’ll Need
To make your no-bake cherry cheesecake, you’ll need these basic tools:
- 9-inch springform pan
- Electric mixer or whisk
- Measuring cups and spoons
- Rubber spatula
- Sharp knife
Optional Equipment to Enhance Your Baking Experience
These tools aren’t necessary but can make your dessert-making better:
- Kitchen stand mixer
- Pastry bag for decorative topping
- Offset spatula for smooth filling
- Digital kitchen scale for precise measurements
Selecting the Right Mixing Bowls and Containers
Choose sturdy, deep mixing bowls for mixing ingredients. Stainless steel or glass bowls are best for no-bake cheesecakes. Make sure your containers have tight lids for chilling the dessert right.
“The right tools can transform a good recipe into an extraordinary culinary experience.”
Pro tip: Clean and prepare your tools before starting your no-bake cheesecake. Being prepared helps make a smooth, delicious dessert that will wow your guests.
Creating the Perfect Graham Cracker Crust

The base of a no bake cherry cheesecake is its graham cracker crust. A well-made crust can make your dessert go from good to great. It should be crisp, flavorful, and hold the cheesecake filling well.
To make a top-notch graham cracker crust, pay attention to details and use some key techniques. Start by picking fresh, crisp graham crackers. Then, crush them into fine crumbs for a smooth base.
- Use a food processor for the most even crumb texture
- Alternatively, place crackers in a sealed bag and crush with a rolling pin
- Aim for crumbs that are fine but not powdery
Butter is key in making the crust stick together. Melted butter helps the crumbs stick together and makes a solid base. The right mix is 1½ cups of crumbs to ⅓ cup of melted butter.
| Ingredient | Quantity | Purpose |
|---|---|---|
| Graham Crackers | 1½ cups | Base of the crust |
| Melted Butter | ⅓ cup | Binding agent |
| Sugar (optional) | 2-3 tbsp | Added sweetness |
Press the mix firmly into your pan for an even layer. Use a spoon or measuring cup to press it down. Chill the crust for 15-20 minutes before adding the cheesecake.
“A great graham cracker crust is the secret weapon of every memorable cheesecake.” – Pastry Chef’s Wisdom
Try using different cookies like chocolate wafers or gingersnaps for extra flavor. Each one can give your cheesecake a unique twist.
Mixing the Creamy Cheesecake Filling
Making the perfect cream cheese dessert needs careful steps and attention. Your no-bake cherry cheesecake filling is key. It makes all the difference in taste and texture.
Cream Cheese Preparation Secrets
The secret to a smooth filling is temperature. Take your cream cheese out 30-45 minutes before mixing. This makes it blend smoothly, avoiding lumps.
- Use full-fat cream cheese for best results
- Ensure cream cheese is completely soft
- Use an electric mixer for maximum smoothness
Achieving Perfect Consistency
Mixing your filling needs a gentle touch. Start slow, then go to medium speed. This makes it ultra-creamy without overworking.
“Patience is the secret ingredient in creating a perfect cheesecake filling.” – Pastry Chef Recommendation
Flavor-Boosting Techniques
Make your dessert better with simple additions. A bit of vanilla or lemon zest can make a big difference.
- Vanilla extract adds depth
- Lemon zest provides brightness
- Powdered sugar helps sweeten naturally
Preparing the Cherry Topping

Making the perfect cherry topping turns your no-bake cheesecake into a summer delight. The right topping can make your dessert go from good to great. It adds a burst of flavor and color.
Choosing the right cherries is key for a great topping. You have three main options:
- Fresh cherries – Best in summer
- Frozen cherries – Good all year
- Canned cherries – Quick and easy
To make a delicious cherry topping, aim for the right mix of sweetness and texture. Here’s a quick guide:
- Wash and pit fresh cherries if using
- Put cherries and sugar in a saucepan
- Simmer until it thickens a bit
- Cool it down before adding to cheesecake
Pro tip: Adding a bit of lemon juice can make the topping brighter and balance its sweetness.
| Cherry Type | Preparation Time | Flavor Intensity |
|---|---|---|
| Fresh Cherries | 15-20 minutes | Highest |
| Frozen Cherries | 10-15 minutes | Medium |
| Canned Cherries | 5-10 minutes | Mild |
“The secret to an incredible cherry topping is patience and quality ingredients.” – Professional Pastry Chef
Your cherry topping is now ready to enhance your no-bake cheesecake. It will make a stunning dessert that’s sure to wow everyone!
Assembly and Chilling Instructions
Making the perfect no-bake cheesecake needs careful steps. You must layer and chill the ingredients just right. This makes your dessert turn out amazing.
Layering Techniques for Perfect Texture
The key to a great no-bake cheesecake is in how you layer it. Here’s how to make a beautiful dessert:
- Start with a firm graham cracker crust base
- Spread cream cheese mixture evenly
- Carefully add cherry topping
- Ensure smooth transitions between layers
Mastering the Chilling Process
Chilling is what turns your no-bake cheesecake into a firm, creamy treat. How long you chill it is very important for the right texture.
| Chilling Duration | Texture Result |
|---|---|
| 4-6 hours | Soft, slightly creamy |
| 6-8 hours | Firm, ideal serving consistency |
| Overnight | Perfect set, maximum flavor development |
Pro tip: Cover your chilled dessert with plastic wrap. This keeps it fresh and prevents moisture from getting in.
“The secret to a great no-bake cheesecake is patience during the chilling process.” – Pastry Chef Recommendation
For the best results, chill your cheesecake for at least 6 hours. This will give you a smooth, creamy texture that will wow your guests and satisfy your sweet tooth.
Storage Tips and Shelf Life
Your delicious make-ahead dessert needs the right care to keep its taste and texture. A no bake cherry cheesecake stays fresh and tasty when stored right.
Keeping it in the fridge is crucial. Use an airtight container to keep out moisture and other tastes. Here are some important storage tips:
- Refrigerate it right after you make it
- Use plastic wrap or a tight lid
- Store it in the coldest part of your fridge
Pro tip: Always use a clean utensil when serving to prevent bacterial contamination.
Your no bake cherry cheesecake will stay good for 3-5 days in the fridge. Freezing is also a great way to keep it longer.
“A well-stored cheesecake is a delicious cheesecake!” – Pastry Experts
Here’s how to freeze your dessert:
- Wrap it tightly in plastic wrap
- Add aluminum foil for extra safety
- Freeze for 1-2 months
- Thaw in the fridge overnight before eating
By following these tips, your no bake cherry cheesecake will stay fresh and delicious. It’ll be ready to wow your guests anytime.
Troubleshooting Common Issues
Making the perfect easy dessert recipe can sometimes face challenges. When you’re making your cream cheese dessert, you might run into some common problems. These can be fixed with the right knowledge.
Texture Troubles in Your Cheesecake
A runny or too-firm filling can mess up your dessert. If your cream cheese dessert is too soft, make sure you chilled the cream cheese well. Also, use full-fat cream cheese. Don’t forget to drain excess liquid from ingredients like cherries to avoid too much moisture.
- Use room temperature cream cheese for smooth mixing
- Whip ingredients at medium speed
- Avoid overmixing to prevent air bubbles
Setting Solutions
Getting your no-bake cheesecake to set right is key. Cold temperatures are your ally. Chill your dessert for at least 4-6 hours, or even better, overnight. This will give you a firm and creamy texture.
“Patience is key when preparing a perfect no-bake cheesecake” – Baking Experts
Cherry Topping Challenges
To stop your cherry topping from mixing with the cheesecake, cool both parts completely before putting them together. Pat the cherries dry and think about thickening the topping with a bit of cornstarch.
- Drain cherries thoroughly
- Use fresh or high-quality canned cherries
- Apply topping just before serving
Pro tip: Always chill your cheesecake in the coldest part of your refrigerator for the best results.
Variations and Creative Twists
Turn your classic no-bake cherry cheesecake into a hit at any potluck with these creative twists. They’ll make your summer treat a standout!
Ready to make your cheesecake unique? Explore these delicious ways to customize it. Impress your friends and family with unique flavors.
Flavor Variations
- Chocolate Lover’s Twist: Mix melted chocolate into the cheesecake filling for a rich, decadent version
- Lemon Zest Delight: Add fresh lemon juice and zest for a bright, tangy summer treat
- Tropical Paradise: Replace cherry topping with mango or passion fruit for an exotic flavor profile
Serving Style Options
- Individual Mason Jar Cheesecakes
- Cheesecake Bars
- Mini Cheesecake Bites
| Variation | Preparation Time | Difficulty Level |
|---|---|---|
| Classic Cherry | 15 minutes | Easy |
| Chocolate Swirl | 20 minutes | Medium |
| Lemon Burst | 18 minutes | Easy |
“Creativity is the key to making any dessert memorable!” – Professional Baker
Make your no-bake cherry cheesecake a versatile potluck favorite with these simple yet impressive variations. Whether you’re after a quick summer treat or an elegant dessert, these twists will take your cheesecake to the next level!
Conclusion
You’ve found the ultimate easy dessert recipe. It turns your kitchen into a fun place. This no bake cherry cheesecake is more than a dessert. It’s a game-changer for those who want tasty results without long hours in the kitchen.
This recipe is simple. It needs little prep time and no baking. You can make a beautiful dessert that looks like it’s from a pro bakery. It’s perfect for dinner parties, family treats, or just a sweet craving.
Cooking is about being creative and having fun. Try different fruit toppings or crusts. Your unique twist will make each dessert special. Get your ingredients ready, follow the steps, and impress everyone with your no bake cherry cheesecake.
Sharing your cooking is half the fun. We can’t wait to hear about your cheesecake adventures. And see the delicious memories you’ll make in your kitchen.